Instance & Access Management
Connecting the portal to your Netbox instance(s) is the first step to unlocking its features. The method you use depends on whether you are using the free, standalone Devicesheet tool or the full, authenticated ydata Portal.
This guide covers both methods and explains the Netbox permissions required for the portal’s features to function correctly.
Unauthenticated Access (Devicesheet Tool)
The free Devicesheet tool uses a simple, browser-based configuration. This method is ideal for individual users or for quick, ad-hoc connections to any Netbox instance.
Key characteristics:
- Local Storage: Your Netbox URL and API token are stored securely in your browser’s local storage (cookies). They are never saved on our servers.
- Manual Configuration: You provide the connection details directly.
- Single Instance: You can only be connected to one Netbox instance at a time.
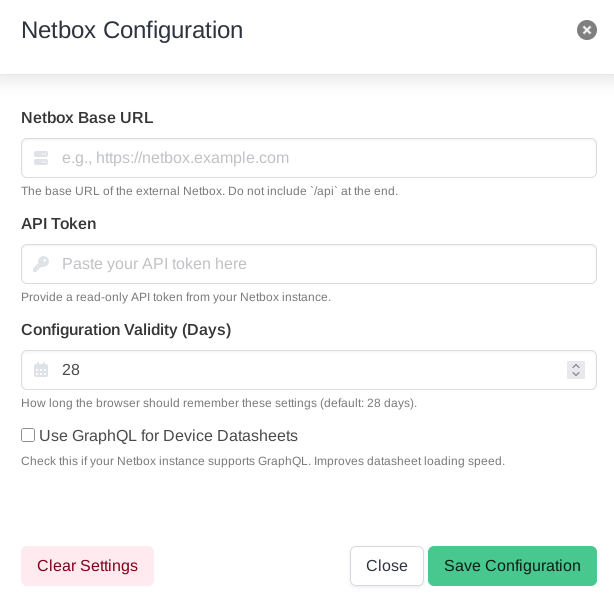
How to Configure
- Navigate to the Devicesheet tool.
- In the top-right of the navigation bar, click on Settings. This opens the “Netbox Configuration” modal.
- Fill in the required fields:
- Netbox Base URL: The full URL of your instance (e.g.,
https://netbox.example.com). - API Token: A read-only API token from your Netbox instance.
- Netbox Base URL: The full URL of your instance (e.g.,
- Click Save Configuration. A status indicator will appear, confirming the connection is active.
Authenticated Access (ydata Portal)
The full ydata Portal provides a robust, multi-user, multi-instance environment integrated with Single Sign-On (SSO). All instance configurations are stored securely in your user account.
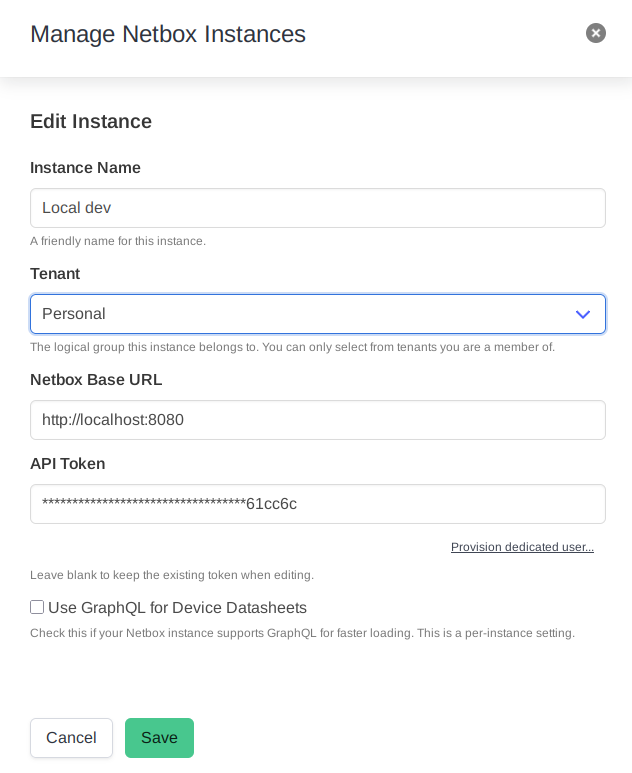
Managing Instances
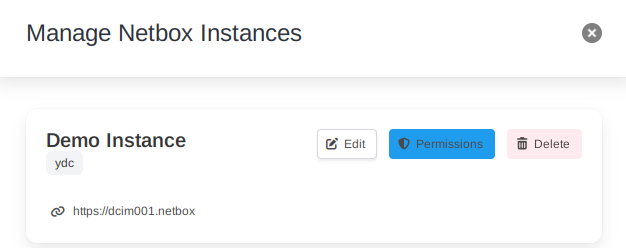
You can add, edit, and switch between multiple Netbox instances via the “Manage Instances” modal.
- Click on your username or the instance selector in the top-right of the navigation bar.
- Select Manage Instances from the dropdown menu.
- From here, you can see a list of your configured instances. Click Add New Instance to open the form.
- Provide a Name, URL, and a API Token.
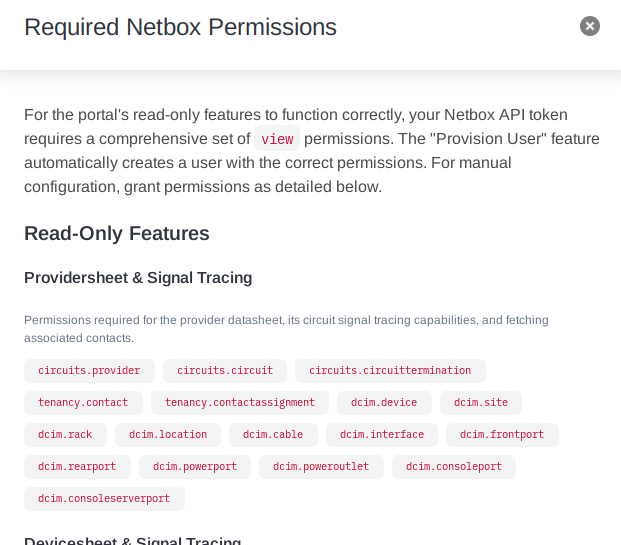
Understanding Required Permissions
The portal is designed to work with a read-only token for most of its features. However, to ensure full functionality, a specific set of view permissions is required.
There are two primary ways to manage and understand these permissions.
1. The Permissions Overview
Within the “Manage Instances” modal, you can find a link or button to view all required permissions.
- Clicking Permissions opens a modal that provides a comprehensive list of every permission the portal uses.
- The list is broken down by feature (e.g., “Device Datasheet”, “Asset Lifecycle”), making it easy to see which permissions power which tool.
- This is the ideal reference for a Netbox administrator who needs to create a custom role or group for portal users manually.
2. Feature-Specific Permissions (Shield Icon)
Throughout the portal, you will see a small shield icon next to the title of each feature page or section.
- Click: Interacting with this shield icon reveals a tooltip or dropdown that displays the exact Netbox permissions required for that specific feature to work.
- Granular Insight: This allows you to quickly look up permissions in context without having to search through the full list. It’s perfect for troubleshooting why a specific tool might not be loading data.
![]()
Provisioning a Dedicated User (Recommended)
To simplify the process and guarantee that the correct permissions are assigned, the portal offers an automated user provisioning feature.
- In the Add New Instance form, click the Provision dedicated user… link below the API Token field.
- A new modal will appear, asking for a
usernamefor the new portal user in Netbox and a temporary Admin API Token. - Why an Admin Token? This token is used only for this one-time operation to create a new user, a
'ydc-portal-users'group, and assign the precise set of read-only permissions to that group. The admin token is never stored. - Click Provision. The portal will connect to your Netbox, perform the setup, and automatically populate the generated read-only token for the new user back into the “Add New Instance” form.
This is the fastest and most reliable way to ensure a correctly configured, secure, read-only connection for the portal.